Scrolling Textures in XNA

Update: I wrote a more advanced version of this article now, which does the same thing but allows the camera to be scaled and rotated too. You can check it out here.
To begin my series of XNA related articles, I’ve decided to start small and describe a simple technique to scroll textures infinitely in any direction. This technique can be used, for instance, to create an infinite layer of moving clouds for a top-down 2D game with a single texture and draw call. As long as the texture you’re drawing is seamless, you can scroll it anyway you want and give the impression of being on an infinite plane. Also, since both the scroll direction and scroll speed are controllable, you can even go ahead as stacking several layers on top of each other and updating them independently to give the feel of parallax scrolling.
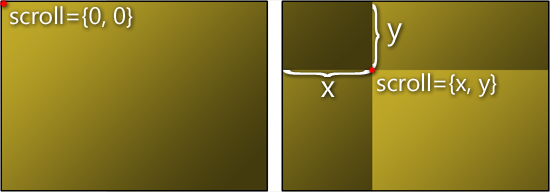
Looking at the picture above should give you a clear image of what it means to scroll a texture (note that the texture in the example is not seamless intentionally in order to make the scrolling coordinates more apparent).The texture on the left side is unscrolled, while the texture on the right side has been scrolled x units to the right and y units down. So, how does one implement this? The main reason I’m writing this article is because I’ve used this technique on two games already, and without realizing it took a route that was much harder and error-prone than the one presented here.
The Bad Way
Let me start by explaining what I did wrong. Look back at the scrolled texture above. It should be apparent that when a texture has been scrolled diagonally, it ends up splitted in four different sections. My first idea was then to draw the texture four different times, and adjust the source rectangles and positions for each of them based on the scroll coordinates. Here’s an example:
// Don't use this implementation! Read end of the article!
Rectangle source1 = new Rectangle(0, 0, texture.Width - scrollX, texture.Height - scrollY);
Rectangle source2 = new Rectangle(texture.Width - scrollX, 0, scrollX, texture.Height - scrollY);
Rectangle source3 = new Rectangle(0, texture.Height - scrollY, texture.Width - scrollX, scrollY);
Rectangle source4 = new Rectangle(texture.Width - scrollX, texture.Height - scrollY, scrollX, scrollY);

Vector2 position1 = new Vector2(position.X + scrollX, position.Y + scrollY);
Vector2 position2 = new Vector2(position.X, position.Y + scrollY);
Vector2 position3 = new Vector2(position.X + scrollX, position.Y);
Vector2 position4 = new Vector2(position.X, position.Y);

spriteBatch.Begin();
spriteBatch.Draw(texture, position1, source1, Color.White);
spriteBatch.Draw(texture, position2, source2, Color.White);
spriteBatch.Draw(texture, position3, source3, Color.White);
spriteBatch.Draw(texture, position4, source4, Color.White);
spriteBatch.End();
It works, but there’s also a caveat - in order to ensure proper behavior you need to guarantee that the scroll coordinates never go beyond the image’s boundries, otherwise the results end up looking messed up. For instance, you could validate your scroll coordinates before drawing by doing:
// Don't use this implementation! Read end of the article!
if(scrollX < 0)
{
    scrollX += texture.Width;
}
else if(scrollX >= texture.Width)
{
    scrollX -= texture.Width;
}
if(scrollY < 0)
{
    scrollY += texture.Height;
}
else if(scrollX >= texture.Height)
{
    scrollY -= texture.Height;
}
The Good Way
Fortunately, there’s a much easier way to do this! I’m sure many of you already know this, and might find it pretty obvious, but sometimes we overly complicate things when there’s a much simpler solution right under our noses. This one occurred to me out of nowhere today, and I had quite a laugh when I realized it actually worked, produced the exact same effect as before, didn’t require any validation of the scrolling coordinates, and the best part of all: it only needed three lines of code!
// Use this one instead!
spriteBatch.Begin(SpriteSortMode.Deferred, null, SamplerState.LinearWrap, null, null);
spriteBatch.Draw(texture, position, new Rectangle(-scrollX, -scrollY, texture.Width, texture.Height), Color.White);
spriteBatch.End();
That’s it! The trick here is to ensure that you’re using an addressing mode that is set to “wrap” (using SamplerState.LinearWrap fits this requirement perfectly) and then make some clever use of SpriteBatch’s source rectangle to simulate the scrolling by passing it the negative of the scrolling position as a starting point. All the wrapping is done automatically by the texture’s addressing mode.
This technique is in a way extremely similar to the tiling technique described by David Amador to create large tiled backgrounds with a single draw call. The only difference is that in the tiling technique you set the source rectangle to (0, 0, somethingLargerThanWidth, somethingLargerThanHeight) while in the scrolling technique you set it to (-scrollX, -scrollY, width, height). But you can also go ahead and mix both of the techniques and create a tiled scrolling texture simply by passing it both the scroll position and a size larger than the original image at the same time.
Note for Windows Phone 7 users: If you’re developing for Windows Phone 7 then your scrolling texture needs to be a power of 2 (e.g. 512x512, 1024x1024, 2048x2048). That is one of the many limitations imposed by using the Reach profile in XNA 4.0 (which is the only one supported by the Windows Phone 7) in order to use the wrap addressing mode. More information here.
Finally, here’s a small video showing texture scrolling in action. The demo has two cloud textures being scrolled at slightly different rates on top of a static background, and as you can see from the source code below, this is extremely easy to do. For something that you can achieve with hardly any changes to your existing code, I think this is quite a nice technique to have in your arsenal. I hope you enjoyed the article, and until next time!